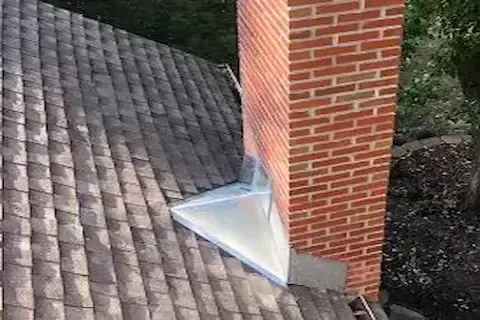
Step Flashing Replacement in Anoka County MN Homes
Water intrusion along a roof-to-wall junction is one of the most damaging and least obvious leaks a homeowner can face. In Anoka County, where freeze-thaw cycles push ice into every gap and spring rains arrive heavy and persistent, proper step flashing is not optional — it is the mechanical barrier standing between your wall cavity and thousands of dollars in rot, mold, and structural repair. If your home is getting a new roof, replacing the step flashing at the same time is the single most important upgrade you can make to that wall junction.
What Step Flashing Actually Does
Step flashing is a series of small L-shaped metal pieces, typically aluminum or galvanized steel, woven one by one between each course of shingles as they rise along a sidewall, dormer wall, or chimney face. Each individual piece overlaps the one below it, creating a continuous stair-step barrier that channels water down and away from the wall rather than letting it migrate behind the siding.
The key distinction between step flashing and other flashing types is the weave. Unlike continuous flashing — a single bent strip that runs the full length of the wall — step flashing moves with the roof. Each piece is nailed to the roof deck, not the wall, so the two surfaces can expand and contract independently. This independence is critical in Minnesota, where temperature swings of 80 degrees or more between January lows and July highs create significant movement in both wood framing and roofing materials.
Why Replacement Happens During Reroofing
Step flashing lives underneath the shingles. You cannot access it, inspect it, or replace individual pieces without removing the shingles first. This is exactly why reroofing is the standard trigger for step flashing replacement. Once the old shingles are stripped, the existing step flashing is exposed and can be evaluated piece by piece.
In most Anoka County homes built before the 1990s, original step flashing is thin aluminum that has corroded, bent out of position, or been painted over and sealed in ways that actually trap water rather than shed it. Aluminum in contact with pressure-treated lumber — common in older deck additions and dormer framing — corrodes faster due to chemical incompatibility. Even homes with galvanized step flashing often show rust streaking and edge deterioration after 20 to 25 years.
Reusing old step flashing under new shingles is a false economy. The labor cost to replace it while the deck is open is minimal compared to the cost of removing sections of new shingles to access a leaking piece two years later. Roof Flashing Repair & Replacement is best handled comprehensively at reroofing time, not piecemeal after the fact.
The Installation Process Step by Step
Correct step flashing installation follows a specific sequence that cannot be shortcut without compromising the water barrier. Each L-bent piece is typically 4 inches by 4 inches on each leg, though 4-by-6 pieces are preferred in high-exposure areas. Here is how the process unfolds from the bottom of the wall junction to the top.
- Starter course: The first shingle course is laid along the eave, and the first step flashing piece is placed at the base of the wall junction, overlapping the starter strip.
- Alternating layers: Each shingle course is followed by one step flashing piece. The shingle laps over the flashing, and the next flashing piece laps over the shingle. The flashing leg against the wall slides under the siding or housewrap.
- Fastening: One nail through the roof-side leg into the deck. The wall-side leg floats free or is held only by the siding — it is never face-nailed through both legs, which would prevent movement.
- Counterflashing: At chimneys and masonry walls, a second layer of flashing — called counterflashing — is cut into the mortar joints and folded down over the step flashing legs to complete the two-part system.
Installers working in Coon Rapids, Blaine, Ham Lake, and other Anoka County communities should account for local conditions when selecting material gauge. Standard 26-gauge aluminum is acceptable for most sidewall applications, but 24-gauge galvanized or copper is worth the upgrade at chimney faces and north-facing dormers where ice accumulation is heavier.
Common Mistakes That Lead to Early Failure
Step flashing failures are almost always installation failures rather than material failures. The flashing itself has a long service life when installed correctly — copper step flashing can outlast multiple roof replacements. The mistakes that cut that lifespan short are consistent and preventable.
Continuous flashing substituted for step flashing is the most common shortcut. Some crews bend a single long piece of aluminum and run it up the wall junction rather than weaving individual pieces. This works for a few years until the single piece develops a pinhole, a lifted edge, or a separation at a fastener, at which point the entire wall junction is exposed.
Caulking instead of weaving is the other frequent failure. Caulk is a maintenance material, not a primary water barrier. It shrinks, cracks, and loses adhesion — especially in the Minnesota climate. A junction sealed only with caulk typically begins leaking within three to five years.
Nailing through both legs locks the flashing rigidly in place, preventing the differential movement that makes the two-part system work. In climates with significant freeze-thaw cycling, this causes the flashing to buckle or pull fasteners loose within a few seasons.
What to Expect From a Qualified Anoka County Contractor
When you are getting roof estimates in Anoka County — whether in Andover, Ramsey, or Lino Lakes — ask specifically whether the bid includes full step flashing replacement or only the shingles. Many standard bids include shingle replacement only, with flashing reuse unless the homeowner requests otherwise or the existing flashing is visibly failed.
A contractor who replaces step flashing correctly will use individual preformed pieces rather than cut-and-bent field fabrications, will not rely on caulk as a primary seal at wall junctions, and will integrate the new step flashing with the existing housewrap or ice-and-water shield on the wall side. Ask to see the junction before siding is reinstalled if access allows — this is one of the few points in the project where you can verify the work directly.
For a closer look at how flashing integrates with other roof system components, see the resources available at where local roofing guidance for Minnesota homeowners is covered in detail.
Step flashing replacement adds minimal cost to a reroofing project and eliminates the most predictable category of post-installation leak. In a county where weather puts consistent pressure on every roof-to-wall transition, getting this detail right the first time is the straightforward path to a dry home.
